
How to export the best MP3 and WAV file settings in FL Studio
Skip the intro and jump to the settings »
FL Studio has quite a variety of exporting options when you are ready to finalize your music project.
At first, these settings can be quite overwhelming if you are not familiar with audio file types. You might wonder which settings to use to achieve the best quality sound.
The major question is…
Should I export to an MP3 file or a WAV file?
Is your audio file intended for use in another musical project such as mixing or mastering? If so, you will definitely want to export your audio as a WAV file to achieve the highest quality output.
Are you distributing your music file to the internet? If so, an MP3 file is definitely your file type of choice. There are several major differences between MP3 and WAV files. Before we get to the export settings, I’m going to go a bit more in depth into the two file types we’ll be using. You need to know the differences of each file type to gain a better understanding of when and why you should use them!
A brief introduction to MP3 files
MP3 files are the standard for the internet when it comes to music.
You’ve probably heard an MP3 file before. The MP3 acronym originates from the MPEG-1 or MPEG-2 Audio Layer III name. MP3 files use lossy compression. A bit of sound quality is lost during the exporting process compared to a WAV file. The MP3 exporting process reduces file size by eliminating some auditory sound that your ears may not be able to recognize.
An average 4 minute MP3 rendered at the highest quality would be close to 10 megabytes in file size. Compare this to a 4 minute WAV file that could range from 60-100 megabytes. The MP3 audio file type is great for the internet, emails, and audio streaming due to its smaller file size. Some quality is lost by using an MP3 format, so you should never use MP3 samples or exports to mix final music projects.
Check out Wikipedia’s page here for an extensive look at the MP3 file: https://en.wikipedia.org/wiki/MP3.
You can also check out https://www.loc.gov/preservation/digital/formats/fdd/fdd000012.shtml for some super in depth information about MP3 file format standards.
A brief introduction to WAV files
The WAV acronym file format stands for Waveform Audio File Format (uncommonly referred to as WAVE). The industry standard when it comes to mixing, mastering and producing music are WAV files. They are much larger in file size compared to their MP3 counterpart, but serve their own unique purpose in music production.
WAV files are great for audio editing because they are uncompressed and this makes them the most commonly used file format in music production today. The maximum allowed file size for a 32-bit WAV file is a whopping 4 gigabytes. I’ve never had a WAV file this big before in my life and I’ve exported thousands of audio files. Your WAV file sizes could be much larger if you are a podcaster.
WAV files can be huge in file size, but amazing in sound quality
There are 64 bit alternatives for WAV files that allow for much larger file sizes if you’re a broadcaster. WAV files were originally developed by Microsoft and IBM. If you hate Microsoft products, you’re still using something developed my them nearly every time you record music digitally.
Check out Wikipedia’s page here for an extensive look at the WAV file: https://en.wikipedia.org/wiki/WAV.
A quick comparison of MP3 and WAV files
View the screenshot below to see an example of how an MP3 and a WAV file compare in my Windows file explorer. Look under the size column to observe the size difference between the MP3 and WAV files. You’ll also notice that the bit rate is incredibly higher for the WAV file. I recommend using only WAV files when recording your own music. Never record instruments or vocals to an MP3 to avoid quality loss. There should be an option in your digital audio workstation software that allows you to choose what file type you wish to record with. Most DAW’s should default to automatically output your recordings to WAV files.

File size difference between mp3 and wav files.
Best MP3 and WAV audio file export settings for FL Studio
Export your file from FL Studio: Go to “File > Export > Mp3/Wav File”
The best possible settings to render files in FL Studio aren’t always necessary. Sometimes you might just need to use average export settings to export MP3 files for test listening and to save time. With that being said, better quality always means longer exporting time and higher file sizes.
Go to File > Export > MP3 File, or press Shift + CTRL + R to quickly export your song as an MP3. If you want to export your entire song, make sure your playlist is set to “song” mode and not “pattern” mode. Exporting in song or pattern mode can be changed by clicking the first drop down menu on the export settings screen.
After clicking export, save your file to your desired location on your computer’s hard drive.
A new window will pop up after you save the file and you should use the settings in the screenshot to achieve the best quality. Keep in mind that I use these settings for my final export due to the amount of time it takes to export an MP3 using the 512-point sinc resampling quality option. If you are simply exporting a song to preview listen, I’d recommend using a lower resampling option such as 24-point sinc. I’ve had 512-point sinc exports take up to a couple of hours to export on heavy duty songs with tons of effects. I always use the highest bit rate possible, 320kbps, when exporting finalized MP3 files. Click start when you are ready to export your file.
Special note: You can click the “background rendering” option and FL Studio will minimize. Background rendering will free up some memory on your machine so you can keep working on other projects whlie the rendering takes place.
MP3 export settings
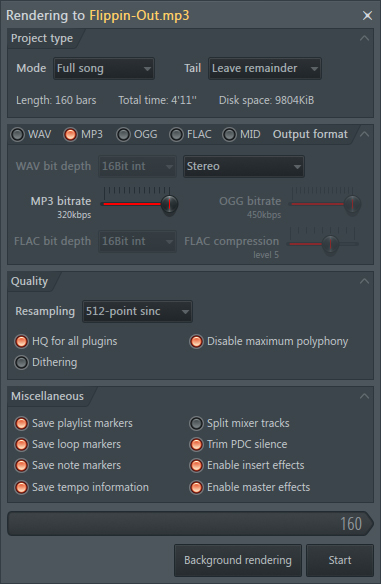
FL Studio best MP3 export settings
WAV export settings
Go to File > Export > Wave File, or press CTRL + R to quickly export your song as a WAV file. Exporting a WAV file is quite similar to an MP3, except you need to tick a few different boxes in the export settings pop up window. Refer to the screenshot to see the best settings for exporting WAV files in FL Studio. If you need to export all of your mixer tracks into individual WAV files, simply highlight the box in the options section that says “Split mixer tracks,” however, take note that this will increase your file size exponentially. 24Bit int WAV file depth is adequate for most projects, however, you may choose a different setting in this drop down menu for WAV file depth. Your quality and file size will increase if you choose a larger bit rate such as 32Bit int.
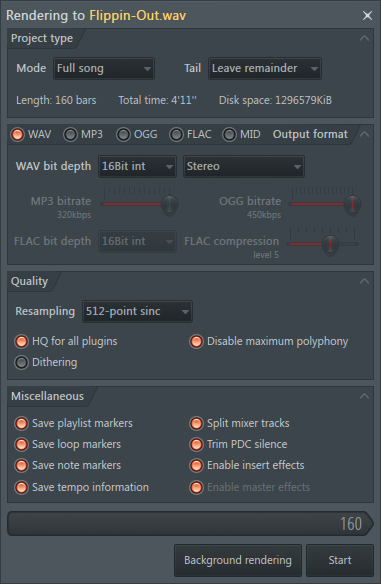
FL Studio best wav export settings
Exporting MP3 and WAV files at the same time
Alternatively, you may choose to export several file types simultaneously to save some exporting time. Simply highlight your desired file types in the settings window and adjust the output settings to your needs. I rarely use file types other than MP3 and WAV, but you can export to MIDI, OGG, and FLAC for other purposes. Make sure you check the proper settings for your MP3 and your WAV file formats before exporting. You may not need your mixer tracks split up, so make sure the “Split mixer tracks” box is not highlighted if the individual tracks are not necessary for your project.